Partition is crucial for the performance of databases with extensive tables and complicated schemas. The table's size can not exceed 32 GB in normal circumstances but before reaching that size performance issues may arise. In any case, partitioning is a good solution to keep the performance of the database up to date.
This guide will explain the use of PARTITION BY in PostgreSQL.
How to Use PARTITION BY in PostgreSQL
Partition helps the database by dividing the large tables into smaller chunks to have better control and manageability over them. Using partitioning allows the query processor to scan smaller tables and indexes to fetch data more efficiently. It also helps PostgreSQL to scale by splitting large logical tables into smaller physical tables.
Syntax
The following is the syntax containing the PARTITION BY RANGE statement with the name of the column on which the partition will be applied. RANGE partition will act on the given ranges and divides the tables according to these ranges:
PARTITION BY RANGE(col_name);
The change in this query is just the keyword of LIST instead of RANGE which contains the column name and divides the table using that list:
PARTITION BY LIST (col_name);
The HASH partition has the column name which acts as the hash key for the partitioning of the table:
PARTITION BY HASH (col_name);
Example 1: PARTITION BY RANGE
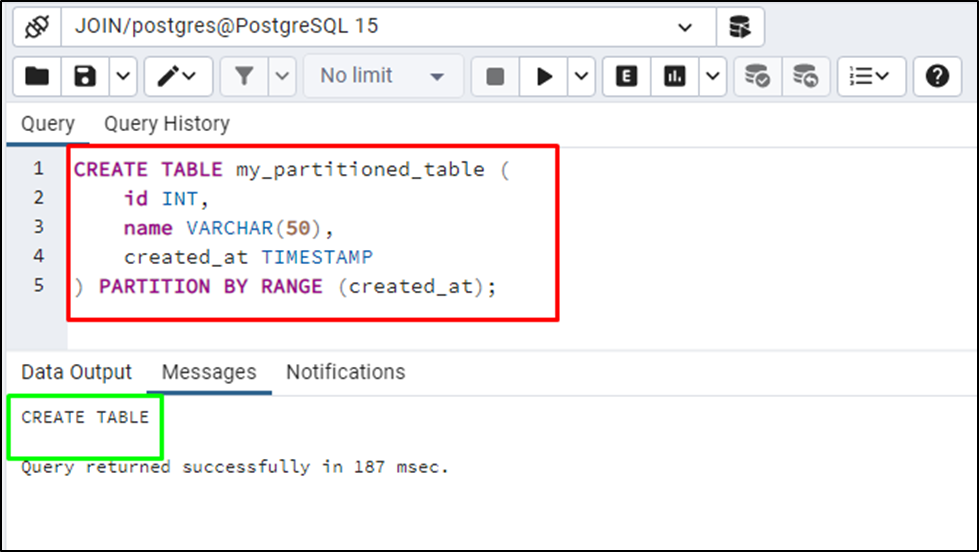
The following example creates a table with multiple fields to store data and apply to partition using the created_at column:
CREATE TABLE my_partitioned_table (
  id INT,
  name VARCHAR(50),
  created_at TIMESTAMP
   ) PARTITION BY RANGE (created_at);
The my_partitioned_table has been created successfully:
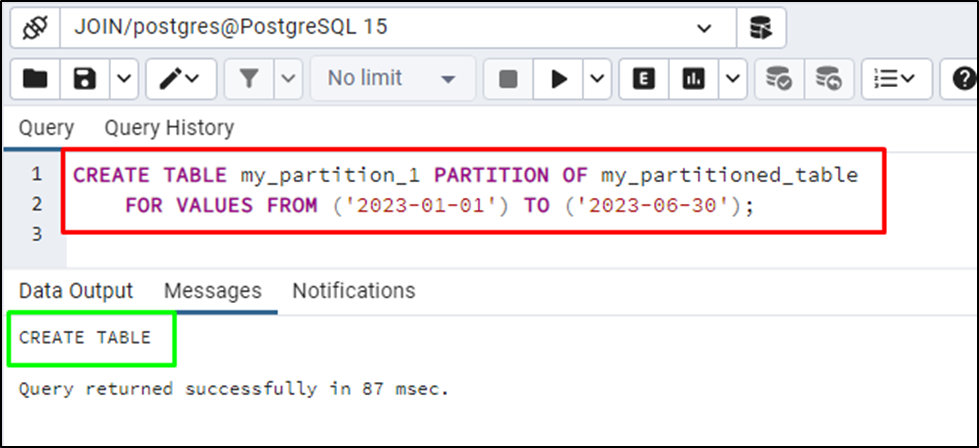
Use the following query to create partitions in the table by giving ranges for the created_at column:
CREATE TABLE my_partition_1 PARTITION OF my_partitioned_table
  FOR VALUES FROM ('2023-01-01') TO ('2023-06-30');
The above query creates a partition by giving the range of dates from the first of the year 2023 to mid of 2023:
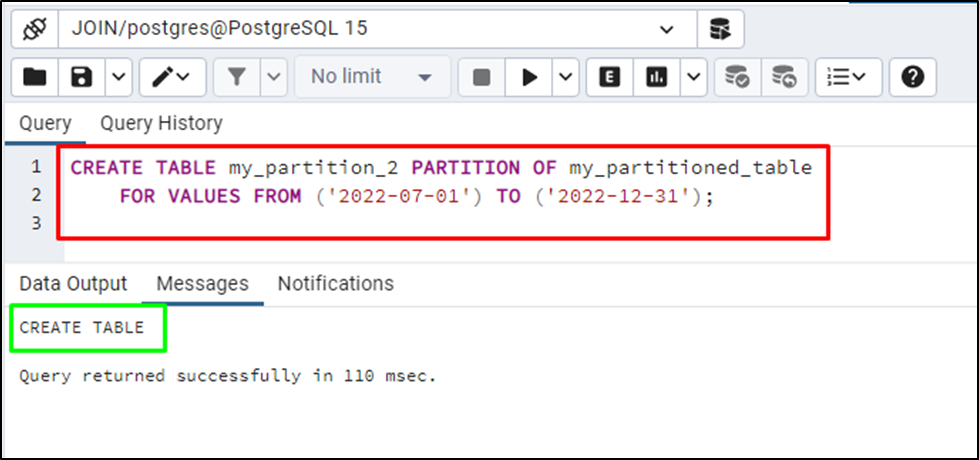
The following query creates a second partition by providing the range from the mid of the year 2022 to the end of 2022:
CREATE TABLE   my_partition_2 PARTITION OF   my_partitioned_table
  FOR VALUES FROM ('2022-07-01') TO ('2022-12-31');
The second partition has been created for the table:
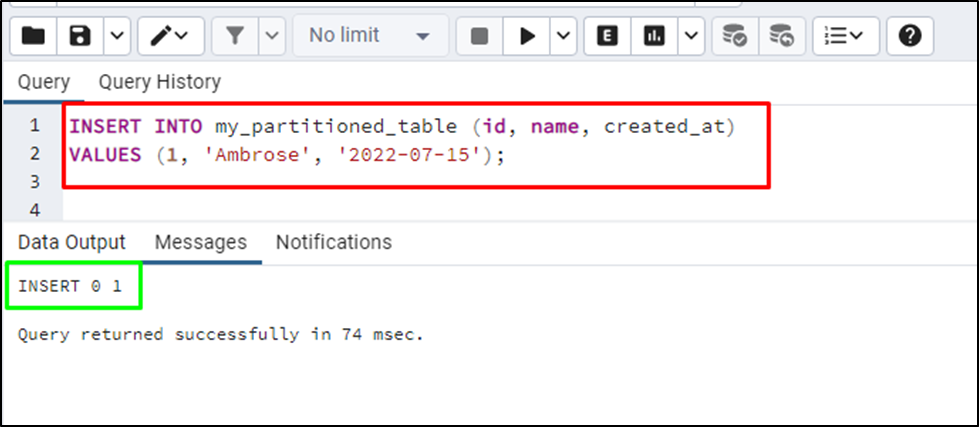
Use the following query to insert data into the table:
INSERT INTO my_partitioned_table (id, name, created_at)
 VALUES (1, 'Ambrose', '2022-07-15');
The data has been inserted successfully:
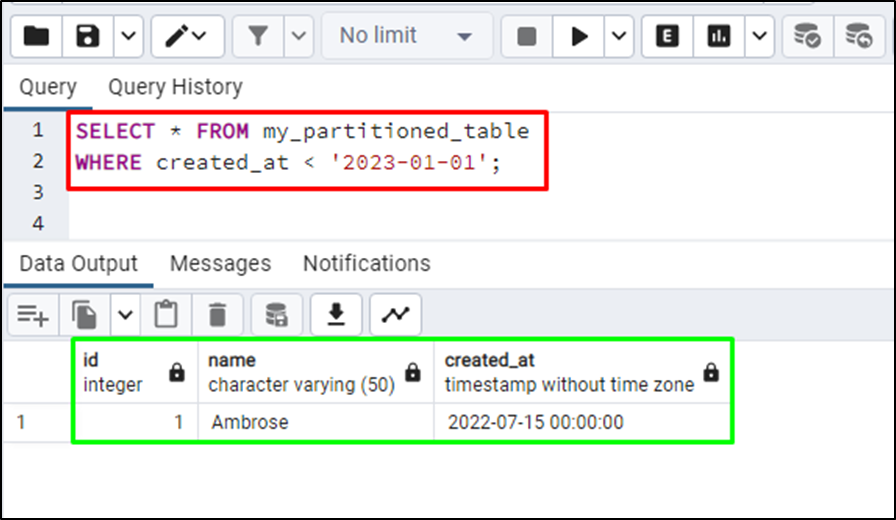
Use the following query to fetch all the data stored in the partition range less than the start of the year 2023 which is the second partition:
SELECT * FROM my_partitioned_table
 WHERE created_at   < '2023-01-01';
The data stored in this range has been displayed on the screen:
Example 2: PARTITION BY LIST
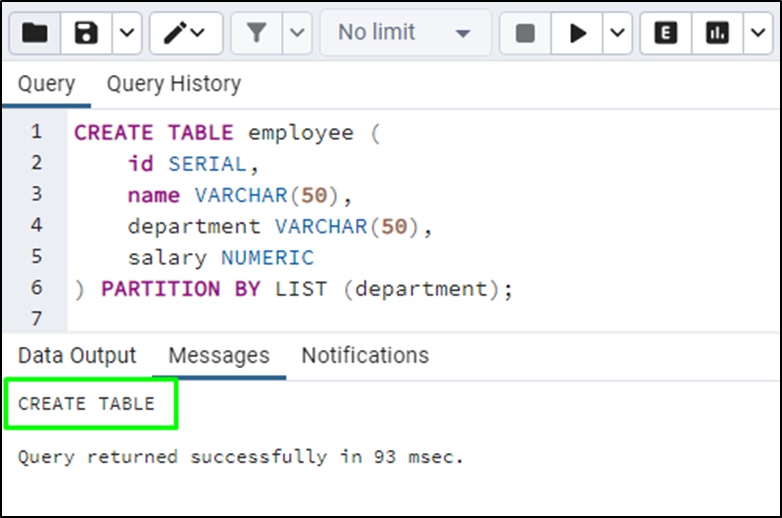
Use another example to create an employee table and apply PARTITION BY LIST on the department column:
CREATE TABLE employee (
  id SERIAL,
  name VARCHAR(50),
  department VARCHAR(50),
  salary NUMERIC
   ) PARTITION BY LIST (department);
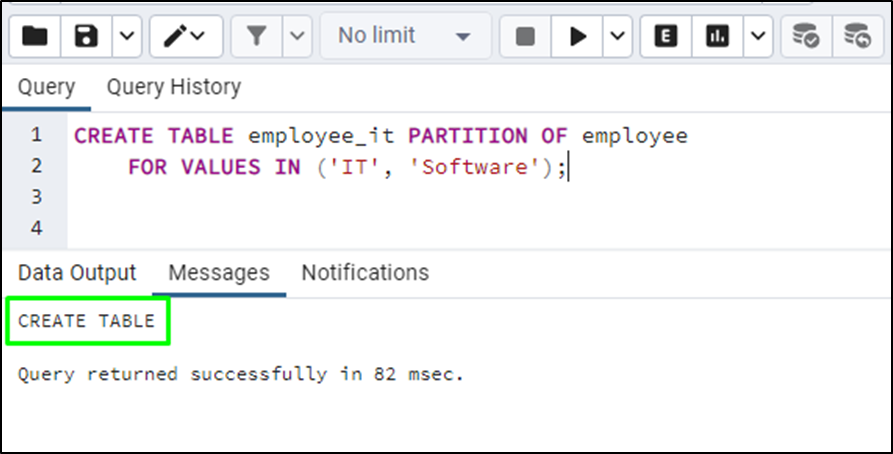
Provide values for the LIST partition while creating a partition to the employee table:
CREATE TABLE   employee_it PARTITION OF employee
  FOR VALUES IN ('IT', 'Software');
The above query creates a partition with the list having “IT” and “Software” values:
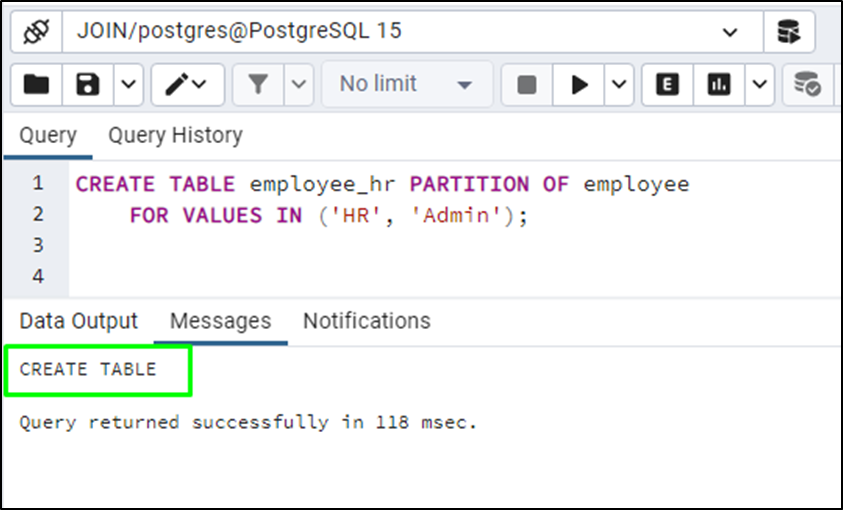
Use the following query to create another partition containing a list having “HR” and “Admin” values:
CREATE TABLE   employee_hr PARTITION OF employee
  FOR VALUES IN ('HR', 'Admin');
Insert the same values in the table and check if the first partition has any data stored in it:
SELECT * FROM employee_it;
Executing the above query displays the data stored in the first partition:
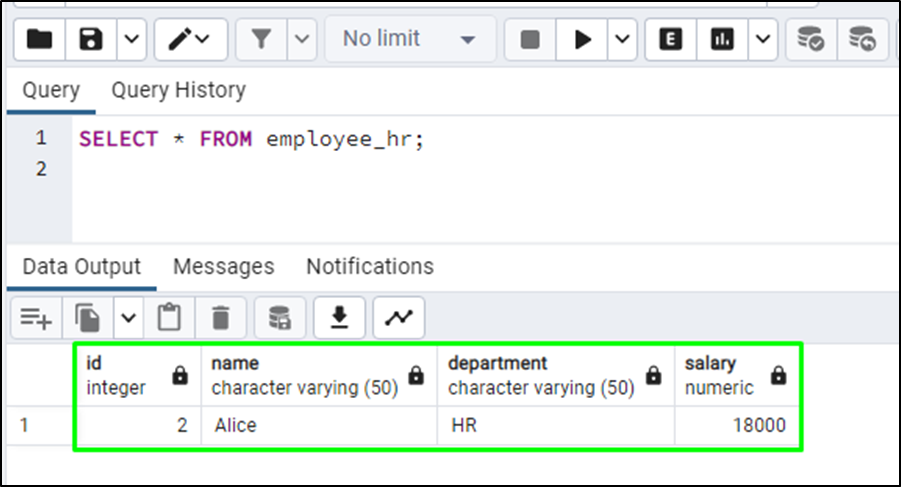
Use this query to check the data from the second partition:
SELECT * FROM employee_hr;
Example 3: PARTITION BY HASH
Follow this example to create an employee table with the PARTITION BY HASH statement at the end of it:
CREATE TABLE   employee (
  id SERIAL,
  name VARCHAR(50),
  department VARCHAR(50),
  salary NUMERIC
   ) PARTITION BY HASH (id);
The table has been created successfully having multiple columns but the partition will be applied on the id column:

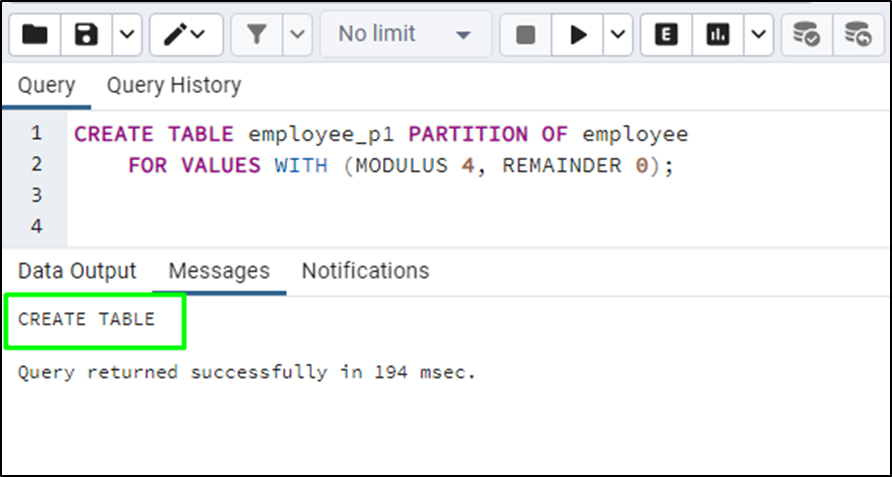
Use the following code to create a HASH partition from the employee table using its id column:
CREATE TABLE   employee_p1 PARTITION OF employee
  FOR VALUES WITH (MODULUS 4, REMAINDER 0);
The above code creates a partition with hash values containing modulus and the remainder on the id column. The modulus value determines the number of partitions a table will be divided into and the remainder determines where the row will be stored. The remainder value is calculated for each row using the hash value and then stores the row in the partition accordingly:
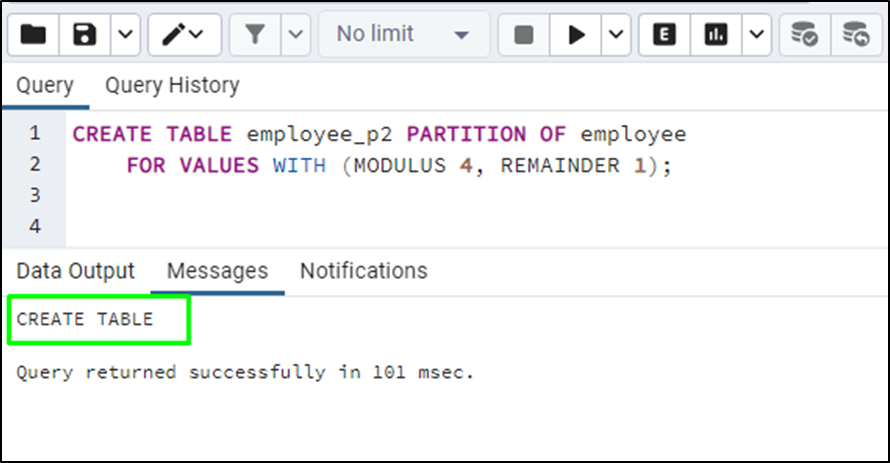
Use this code to create another partition of the employee table with a modulus value equal to 4 and 1 as the remainder:
CREATE TABLE   employee_p2 PARTITION OF employee
  FOR VALUES WITH (MODULUS 4, REMAINDER 1);
Insert some data in the table and use this query to select data from the first partition:
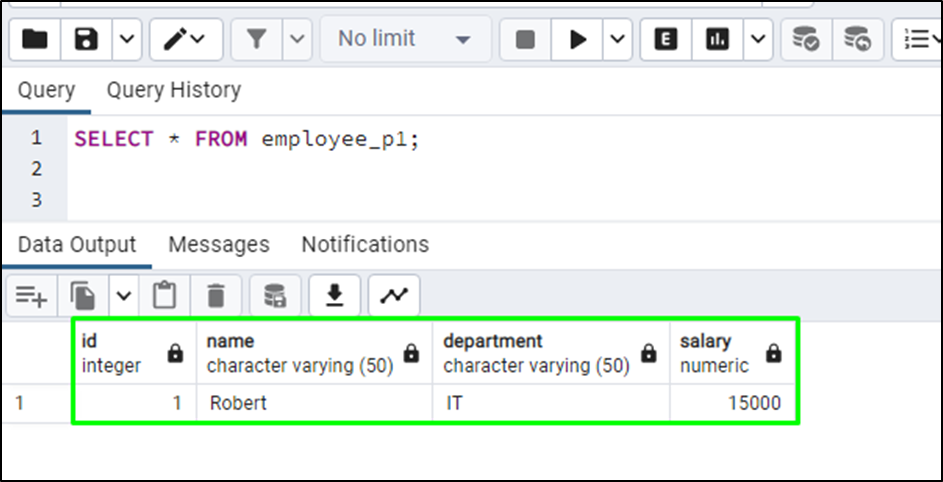
SELECT * FROM employee_p1;
Running the above code displays the data stored in the first partition:
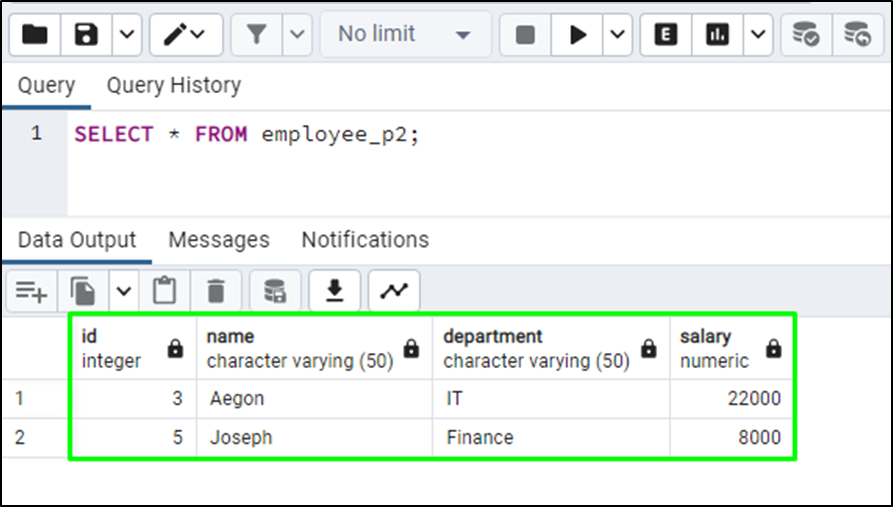
Use the following query to get the data stored in the second partition:
SELECT * FROM employee_p2;
That’s all about using PARTITION BY in PostgreSQL.
Conclusion
Partitioning the tables in the database is very useful to keep them efficient and allows the query process to scan tables quickly. There are multiple methods of partitioning tables such as PARTITION BY RANGE, LIST, and HASH. This guide has explained the use of PARTITION BY statements in PostgreSQL with examples for each method.