
PostgreSQL trigger functions are similar to regular user-defined functions. They are invoked when a particular database event (for example INSERT, UPDATE, DELETE) occurs. Triggers do not take any argument or parameters and return a value having a type trigger.
What are Triggers in Postgres?
Triggers are set to take action usually in the following cases:
- Before taking some action on the row, such as checking constraint and INSERT, UPDATE, and DELETE actions are taken.
- After completion of some actions, such as checking constraints and INSERT, UPDATE, and DELETE actions have been completed.
- In spite of any action on a row such as INSERT, UPDATE, and DELETE actions on a view.
Types of Triggers
There are basically two types of triggers:
● Row Level Triggers
A trigger created as FOR EACH ROW is fired once for each row which is getting modified by the operation.
● Statement Level Trigger
A trigger marked as FOR EACH STATEMENT is fired once for each statement or transaction regardless of how many rows are modified.
Example
If a database contains 2000 rows, and we are applying the UPDATE command to update the records. Now if we use the FOR EACH ROW command, it will fire 2000 times, once for each updated row. But if we use FOR EACH STATEMENT, it will be fired only one time regardless of how many rows have been updated.
Let's learn how triggers are created in PostgreSQL.
How to Create a Trigger in PostgreSQL?
Following are the steps that we need to follow to create a trigger in Postgresql:
- First, We create a “trigger function” using the CREATE FUNCTION command.
- Second, we use the CREATE TRIGGER statement to connect/bind the trigger function to the table.
Creating Trigger Function
Create a "trigger function" as the initial step. A trigger function is basically defined by the user. This function does not need any argument to be passed into it and it returns the value having a data type trigger. The trigger function is created using the CREATE FUNCTION command.
The following code illustrates the syntax for creating a trigger function:
CREATE FUNCTION trig_function()
 RETURNS TRIGGER
 LANGUAGE PLPGSQL
 AS $$
 BEGIN
  -- code for trigger
 END; $$
In the above syntax, the language used to create the trigger function is PL/pgSQL but we can create it using any of the languages supported by PostgreSQL.
The trigger function gets the information about its calling event through TriggerData, which contains some set of local variables. For example, the words “OLD” and “NEW” refer to the status of the row. The OLD keyword refers to the status of the row, i.e. proj_status in this case, before the triggering event has occurred. The NEW keyword refers to the status of the row after the triggering event.
Binding Trigger Function to the Table
After creating the trigger function, we can attach it to one or multiple triggering operations such as UPDATE, INSERT, and DELETE for the table. We do this by querying the CREATE TRIGGER command. Let's have a look at its syntax:
CREATE TRIGGER trig_name
  {BEFORE | AFTER |INSTEAD OF} { event_name }
  ON tab_name
  [FOR [EACH] { ROW | STATEMENT }]
  EXECUTE PROCEDURE trig_function
In the above syntax:
● trig_name specifies the name of the trigger which we have to specify after the keyword TRIGGER.
● {BEFORE | AFTER |INSTEAD OF} specify the time of trigger execution.
● Event_name is the name of the event/operation that is to be triggered such as UPDATE, INSERT, and DELETE.
● Tab_name gives the name of the table on which the trigger is to be executed/fired.
● [FOR [EACH] { ROW | STATEMENT }] specifies the type of trigger and we have already discussed the types of triggers in the above section.
● EXECUTE PROCEDURE is followed by the trigger function that is to be executed when a trigger is fired.
Example:
Let’s consider an example of the database table possessing the status of the projects being developed in a software house. Let's suppose the query for the table is as follows:
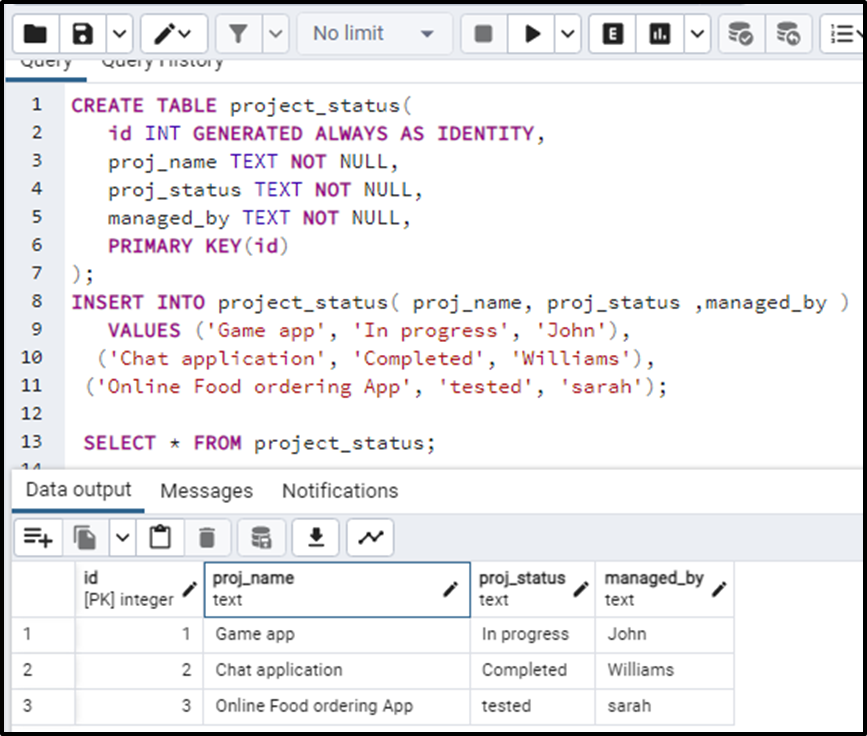
DROP TABLE IF EXISTS project_status;
CREATE TABLE project_status(
  id INT GENERATED ALWAYS AS IDENTITY,
  proj_name TEXT NOT NULL,
  proj_status TEXT NOT NULL,
  managed_by TEXT NOT NULL,
  PRIMARY KEY(id)
   );
Now insert values to the table:
INSERT INTO project_status( proj_name, proj_status ,managed_by )
  VALUES ('Game app', 'In progress', 'John'),
    ('Chat application', 'Completed', 'Williams'),
  ('Online Food ordering App', 'tested', 'sarah');
The table is given as:
Now consider the case if we want to change the status of the project and log these manipulations in the other table called “project_audits”:
CREATE TABLE project_audits (
  id INT GENERATED ALWAYS AS IDENTITY,
  proj_status VARCHAR(225) NOT NULL,
  updated_on TIMESTAMP(6) NOT NULL
   );
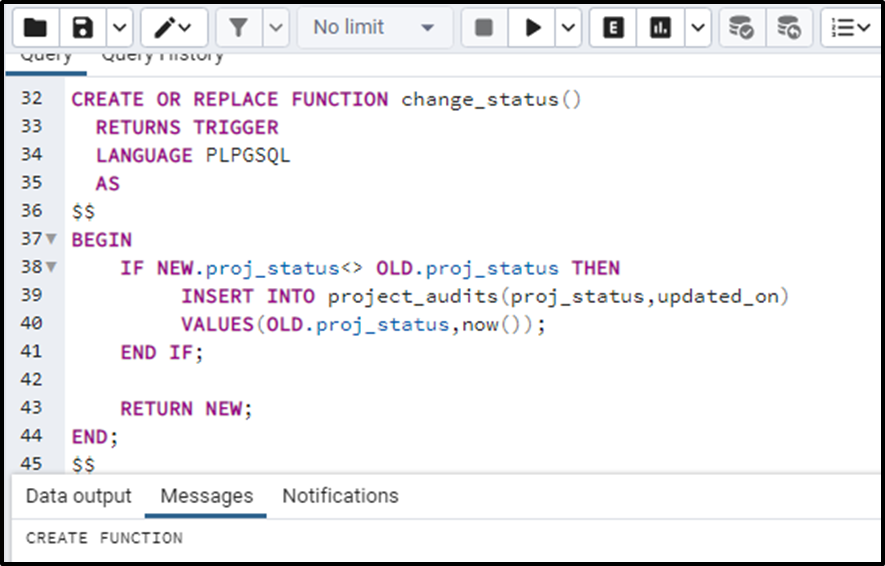
Now we will be creating a trigger function called, change_status. The function returns a trigger. The syntax would look like this:
CREATE OR REPLACE FUNCTION change_status()
  RETURNS TRIGGER
  LANGUAGE PLPGSQL
  AS
   $$
 BEGIN
  IF NEW.proj_status<> OLD.proj_status THEN
   INSERT INTO   project_audits(proj_status,updated_on)
   VALUES(OLD.proj_status,now());
  END IF;
 RETURN NEW;
 END;
   $$
Here we can see two keywords i.e. OLD and NEW. The OLD keyword refers to the status of the row, i.e. proj_status in this case, before the triggering event has occurred. The NEW keyword refers to the status of the row after the triggering event.
So what the code actually does is, it says that if the proj_status (which is a row in the table) before and after the trigger event (that is "update” in this case we will have a look at it) are not equal( <> ) then insert two columns into the “project_audits” table that is proj_status and updated_on, having the values old value of proj_status and the current time respectively.
The function has been created:
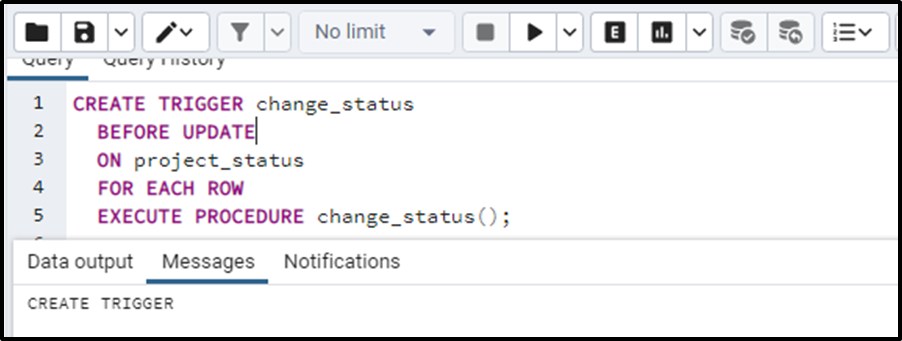
Next we have to bind the trigger function to the table so we will write the following syntax:
CREATE TRIGGER change_status
  BEFORE UPDATE
  ON project_status
  FOR EACH ROW
  EXECUTE PROCEDURE change_status();
The trigger is created with the name “change_status” and it is specified that the trigger needs to be executed before the update command. The trigger has to be fired on the table”project_status” on each row. After EXECUTE PROCEDURE we write the trigger function declared above.
The trigger is successfully created:
If we update the status of the project with ID 1 from “in Progress” to “completed” we will write the following query:
UPDATE project_status
 SET proj_status = 'Completed'
 WHERE ID = 1;
SELECT * FROM project_status;
The project status of the project with ID number 1 has been successfully updated:
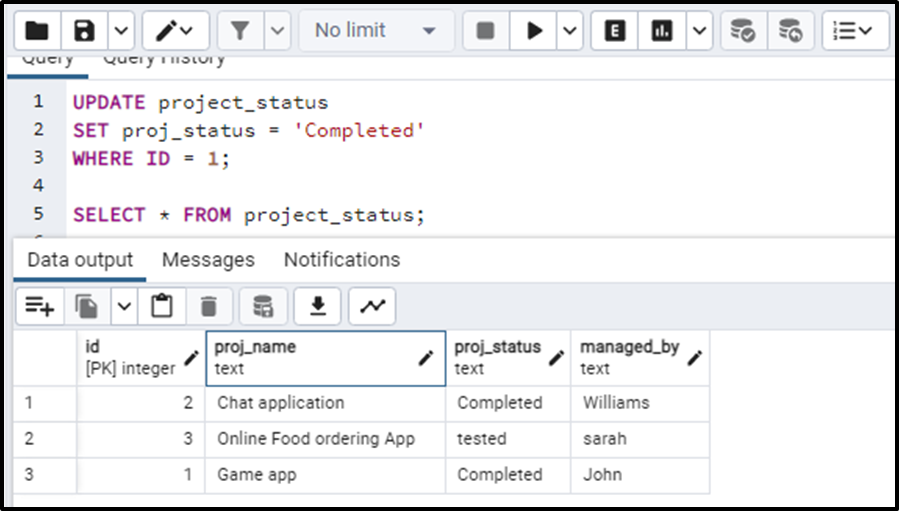
As seen in the above output, the status of the project has been updated. Now he will have to verify whether the change has also been reflected in the “project_audits” table or not.
SELECT * FROM project_audits;
The query results in
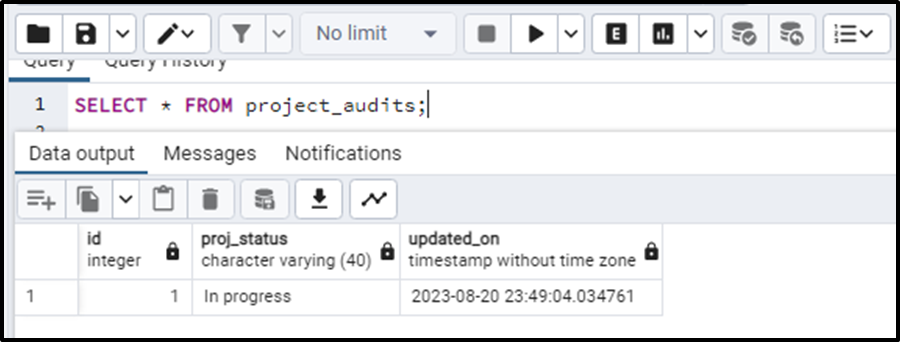
This means that our trigger event has worked correctly.
Benefits of Trigger
Triggers are useful in many ways. Some of them are enlisted below:
● Triggers can be used for audit purposes. We can get the record of every transaction as we have seen a similar case in the example above.
● Triggers can handle errors related to the DB.
● Triggers are defined once and can be reused throughout an application.
● Triggers can counteract any invalid data exchange. They are usually used for validating input data.
Conclusion
Triggers are useful in many ways such as keeping an audit for changes and transactions, applying the business rules, and validating the user input data. This function also assists in duplicating the data to several files which results in data consistency. We first need to create a function that is basically the trigger function and knows what to do when a trigger is fired. Then we create the trigger and bind it to the table. This is how triggers work.