
PostgreSQL offers a GRANT statement that is used to assign privileges to the database objects. The database object can be a schema, a table, a function, and so on. In Postgres, the GRANT statement assists the users in accessing and overriding the specific role. In Postgres, you can grant all privileges to a user via the "GRANT ALL" statement.
Try the latest PgManage (Open Source) and get rid of PgAdmin!
This blog post will present a comprehensive guide on granting all privileges to the users in Postgres via practical demonstration. So, let’s start.
How to Grant All Privileges to Users in Postgres?
When a role with the LOGIN attribute is created, it can log into the PostgreSQL database server. However, it cannot interact with the database objects until privileges are granted to that role. To grant all privileges to a user, follow the below syntax:
GRANT ALL
ON tbl_name
TO rol_name;
In the above syntax:
- GRANT is a statement that assigns privileges to the users.
- ALL is an option used with the GRANT statement to give all the privileges to the users.
- tbl_name represents a table.
- rol_name specifies which role should be granted privileges.
Contact us today for all your Postgres and Open Source consulting and support needs.
Let’s understand it via practical examples.
Example: Grant All Privileges to User
This example presents a step-by-step procedure to grant all the privileges to the users in Postgres:
Step 1: Create a Role
Let’s create a role named “admin” with LOGIN privileges:
CREATE ROLE admin LOGIN PASSWORD 'cp12345';

From the output snippet, you can observe that a role has been created.
Step 2: Verify Roles
To verify the role’s creation, run the “\du” command as follows:
\du;
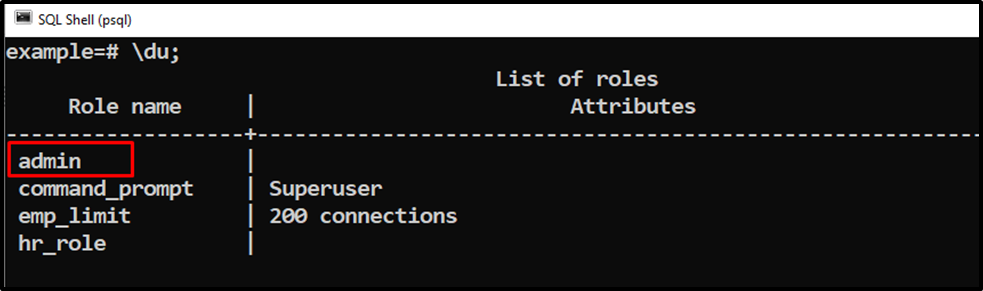
A role named “admin” has been created.
Step 3: Create Table
Now, let’s create a new table named “shortlisted_students” with three columns:
CREATE TABLE shortlisted_students(
student_id INT PRIMARY KEY,
student_name VARCHAR(50),
student_email VARCHAR(100)
);
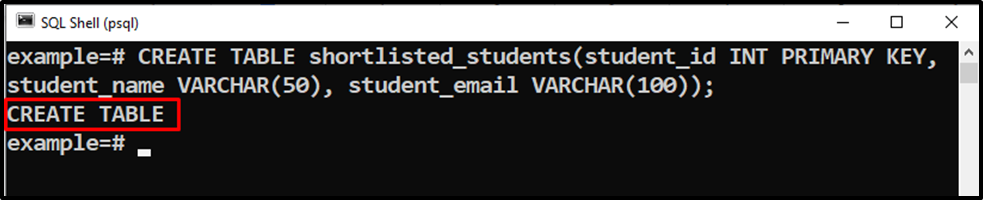
The table named “shortlisted_students” has been created successfully.
Step 4: Login as New User
Log in as an “admin” user from a new separate session:
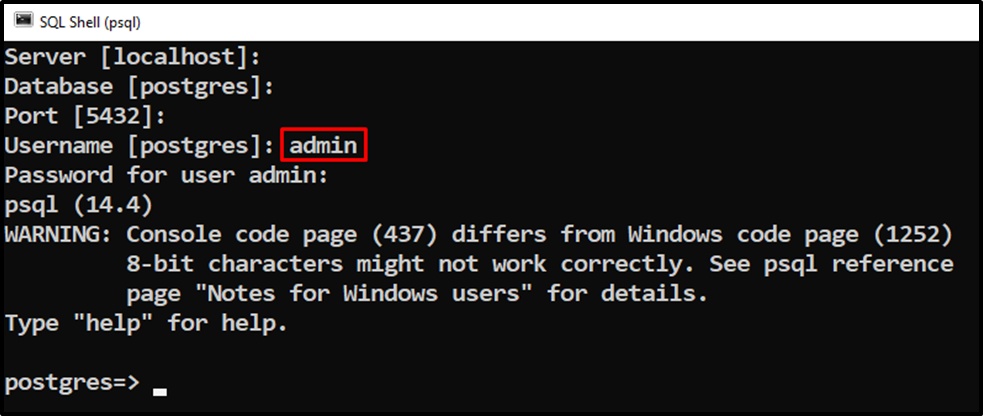
Now, we are logged in as an “admin” user.
Step 5: Insert Data
Now try to insert data into the “shortlisted_students” table from the “admin” session:
INSERT INTO shortlisted_students(student_id, student_name, student_email)
VALUES (1, 'Joseph', 'joseph@12345');

The above snippet shows that the user “admin” doesn’t have privileges to edit the shortlisted_students.
Step 6: Grant All Privileges
Now, log in as a superuser and grant all the privileges on the shortlisted_students table to the “admin” role. To do so, run the GRANT statement with the ALL option:
GRANT ALL ON shortlisted_students TO admin;

The output snippet shows that all the privileges have been granted to the admin role.
Step 7: Insert Data
Now run the insert query one more time:
INSERT INTO shortlisted_students(student_id, student_name, student_email)
VALUES (1, 'Joseph', 'joseph@12345');

The output clarifies that one record has been inserted into the shortlisted_students table.
Step 8: Fetch Data
To get the data from the shortlisted_students table, we will execute the SELECT command as follows:
SELECT * FROM shortlisted_students;
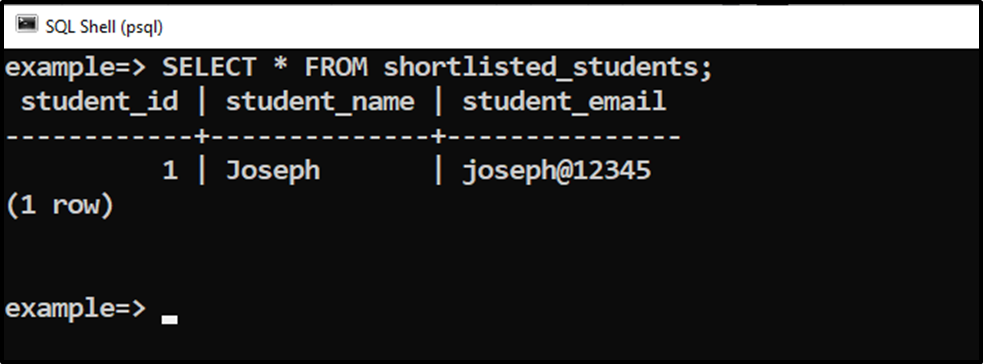
The output proves that all the privileges have been granted to the user.
Conclusion
PostgreSQL offers a GRANT statement that is used to assign privileges to the database objects. In Postgres, you can grant all privileges to a user via the "GRANT ALL" statement. When a role with the LOGIN attribute is created, it can log into the PostgreSQL database server. However, it cannot interact with the database objects until privileges are granted to that role. This blog post demonstrated the working of the GRANT statement via practical examples.